<?xml version="1.0" encoding="utf-8"?><feed xmlns="http://www.w3.org/2005/Atom" ><generator uri="https://jekyllrb.com/" version="4.4.1">Jekyll</generator><link href="/feed.xml" rel="self" type="application/atom+xml" /><link href="/" rel="alternate" type="text/html" /><updated>2026-07-28T21:53:18+00:00</updated><id>/feed.xml</id><entry><title type="html">Hunting Words for Fun and No Profit</title><link href="/posts/word-hunting" rel="alternate" type="text/html" title="Hunting Words for Fun and No Profit" /><published>2024-10-22T00:00:00+00:00</published><updated>2024-10-22T00:00:00+00:00</updated><id>/posts/word-hunting</id><content type="html" xml:base="/posts/word-hunting"><![CDATA[<div class="imgCont">
    
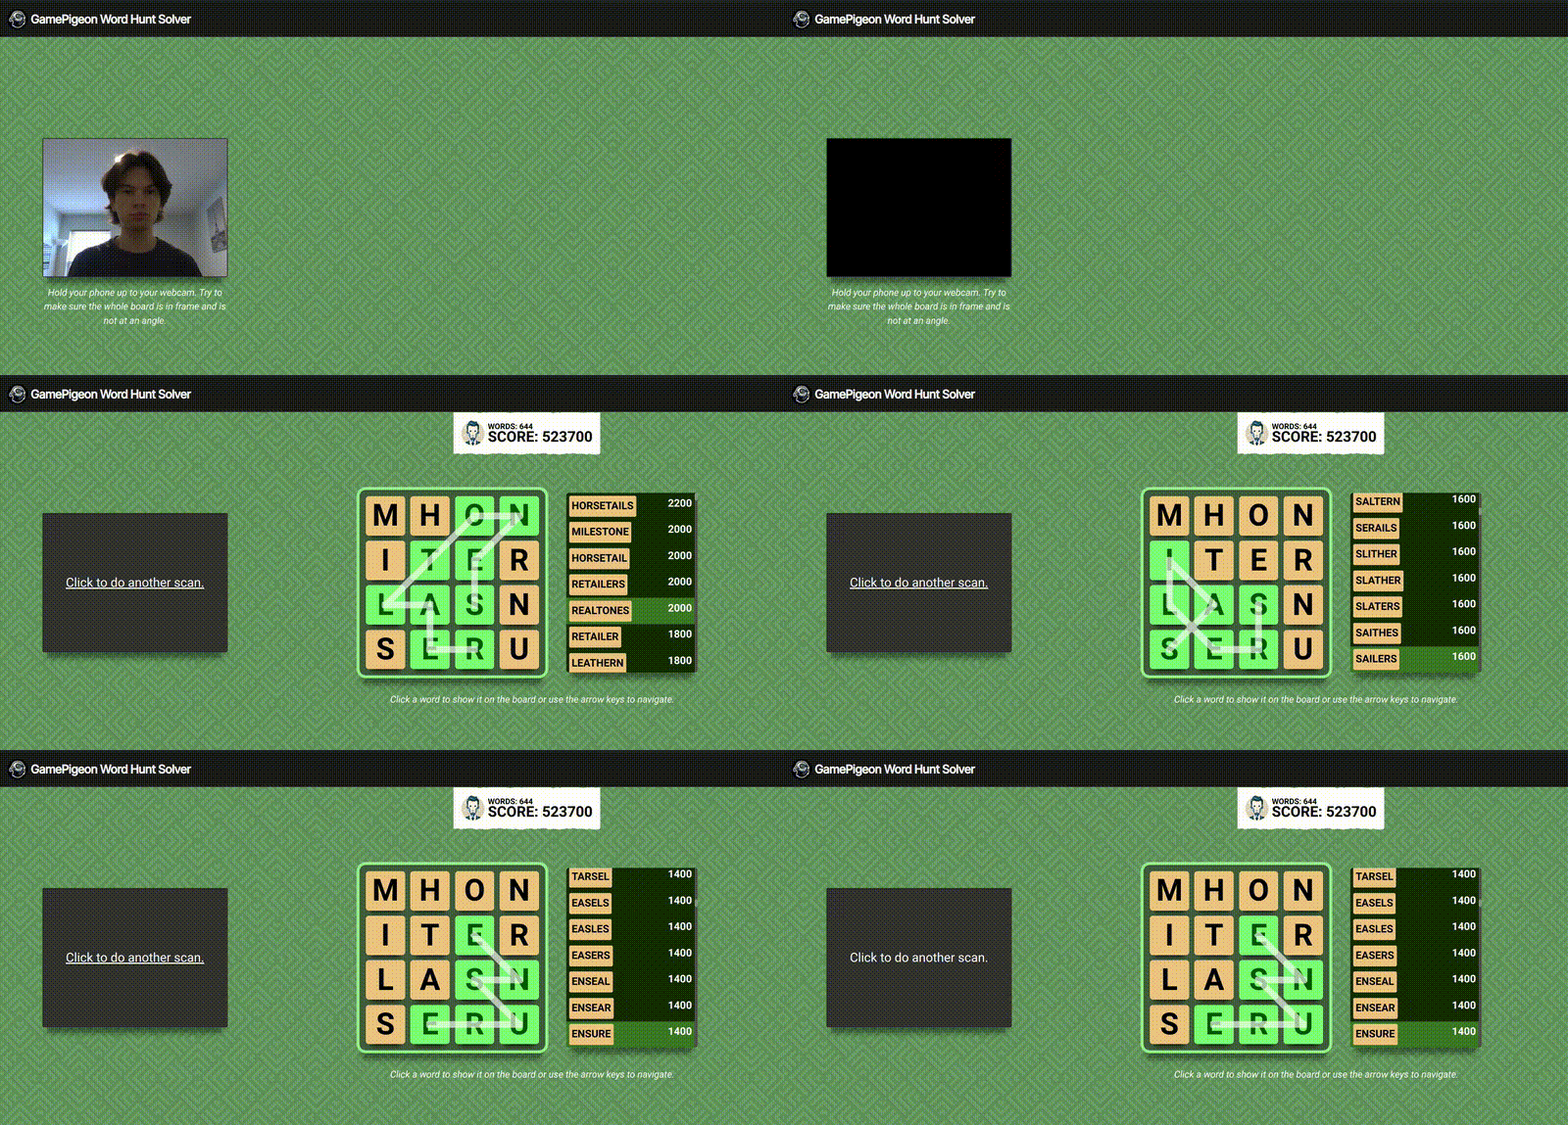
        <img src="/assets/images/wordhunter.gif" class="clickToModal postImage" style="" />
        
        
        <p class="imgCaption">The app in action</p>
    
 
</div>

<p>I like Word Hunt. I don’t even have an iPhone (I use a Pixel running <a href="https://grapheneos.org/">GrapheneOS</a>), but I borrow them so often to play that my “obsession” with the game has become a bit.</p>

<p>I created this web app at the height of this in summer of 2024. I was initially motivated by questions about optimal play and score distributions but ended up building a solver that finds all words and on a board and the maximum achievable score.</p>

<p>You can try it out <a href="https://kenmyers.io/wordhunter">here</a>. You can also view the <a href="https://github.com/ken-myers/wordhunter">source code</a> on GitHub.</p>

<h2 id="the-game">The Game</h2>

<div class="imgCont">
    
        <img src="/assets/images/wordhunt-screen.png" class="clickToModal postImage" style="width:250px;" />
        
        
        <p class="imgCaption" style="width:250px;">A screenshot of a Word Hunt board</p>
    
 
</div>

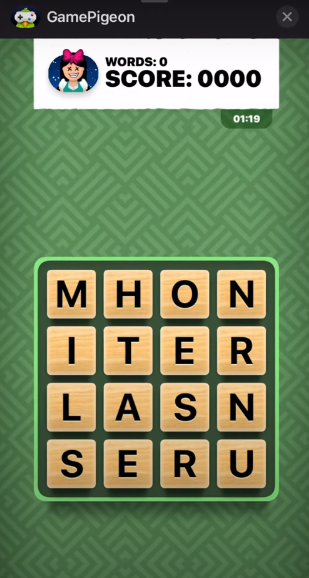
<p>For the uninitiated, Word Hunt is a lot like Boggle. The goal of the game is to find as many words as you can on a board like above in the time allotted. You construct words by connecting adjacent letters on the grid (e.g., “laser” would be a word on this board, though I leave finding it as an exercise for the reader). Diagonal moves are allowed and each tile can only be used once in a word. Longer words give you more points.</p>

<h2 id="reading-boards">Reading Boards</h2>

<div class="imgCont">
    
        <img src="/assets/images/wordhunt-cv.jpg" class="clickToModal postImage" style="width:400px;border: 1px black solid" />
        
        
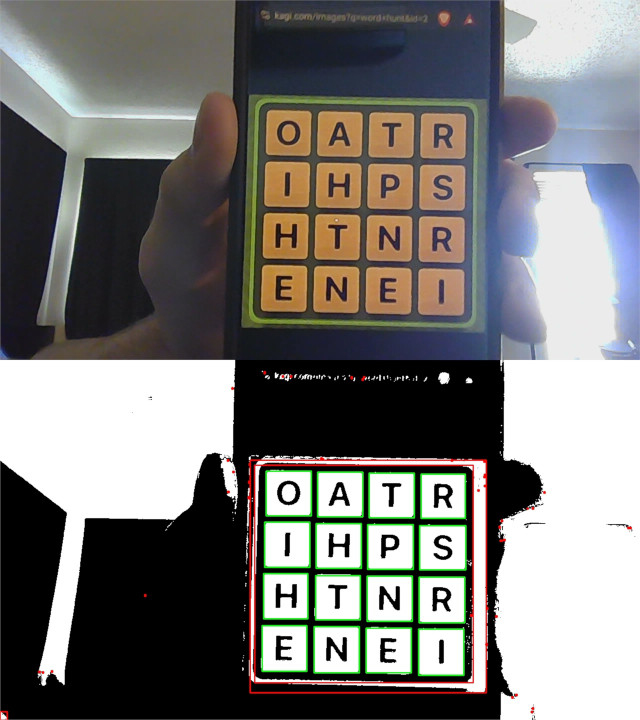
        <p class="imgCaption" style="width:400px;">A webcam image before and after preprocessing and board identification. All squares found are boxed in red. Those identified as tiles, in green.</p>
    
 
</div>

<p>Since games are timed at 80 seconds, having users type in each letter of their board was not an option. I opted instead to use <a href="https://opencv.org/">OpenCV</a> to read in the board from an image.</p>

<p>The logic for this was relatively simple:</p>

<ul>
  <li>First, do standard pre-processing (convert the image to grayscale and binarize)</li>
  <li>Use OpenCV to find contours (edges of shapes)</li>
  <li>Approximate each contour as a quadrilateral</li>
  <li>Compare contour positions and dimensions to look for a large square with a 4x4 grid of smaller squares inside of it. If that’s found:
    <ul>
      <li>Split the image into its 16 tiles</li>
      <li>Iterate through them left to right, top to bottom, and use <a href="https://en.wikipedia.org/wiki/Template_matching">template matching</a>* to correspond each to a letter.</li>
    </ul>
  </li>
</ul>

<p>If all tiles are found and each matches a character, the result is a 2D array of characters representing the game board.</p>

<div class="small-print">
  <p><br />
*<em>I tried a few other methods including <a href="https://github.com/tesseract-ocr/tesseract">tesseract</a> and <a href="https://github.com/JaidedAI/EasyOCR">EasyOCR</a>, but this worked the best. This meant that I needed 26 reference images to cover all possible letters that could appear on the board. Most of these were available online from random screenshots and videos, but I did have to play ~20 games on my girlfriend’s phone to find a board with a ‘Z’ I could screenshot.</em></p>
</div>

<h2 id="hunting-words">Hunting Words</h2>

<div class="imgCont">
    
        <img src="/assets/images/trie-search.gif" class="clickToModal postImage" style="border: 1px black solid" />
        
        
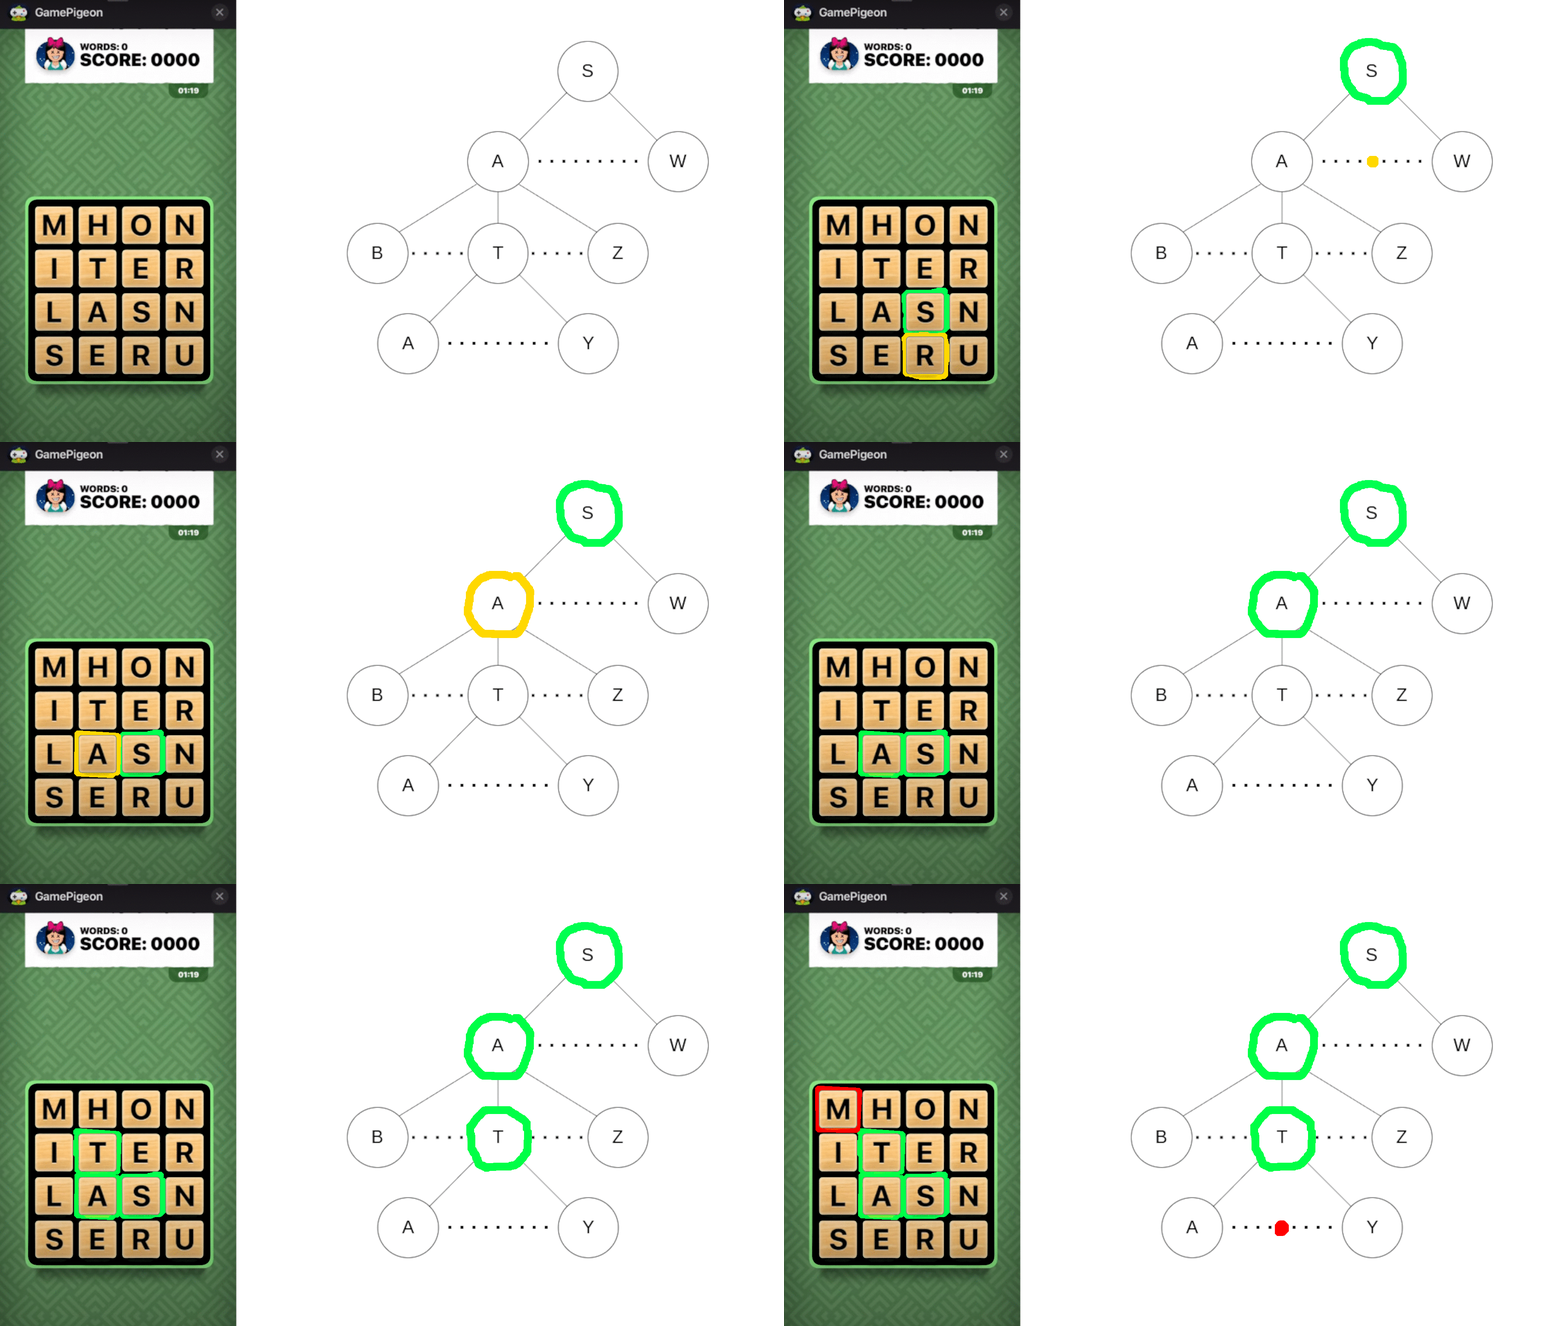
        <p class="imgCaption">An animation showing early stopping with a trie. The paths branching from the red-boxed R and M are skipped because no English words begin with 'SR' or 'SATM'.</p>
    
 
</div>

<p>Solving the board by brute force (trying all possible letter combinations) is greatly suboptimal and not likely to run quick enough on more limited hardware. Instead, I used a <a href="https://en.wikipedia.org/wiki/Trie">trie</a>, which stores an entire dictionary as a tree where branches are possible next characters and nodes indicate whether a string is a valid prefix or word. Importantly, a node only has branches for next characters that could lead to a real English word, not always for all 26 letters. Resultant dead ends allow the program to stop exploring paths that can’t lead to valid words. For example, since no English word starts with ‘wx’, the program can immediately skip further checks once it reaches that combination.</p>

<p>In pseudo-code, the algorithm looks like this:</p>

<ul>
  <li>Initialize an empty list of words</li>
  <li>For each tile on the board:
    <ol>
      <li>Initialize an empty word string</li>
      <li>Append the current tile’s letter to the word string</li>
      <li>Check if the current string is a valid prefix according to the trie
        <ul>
          <li>If it is not, end this branch</li>
        </ul>
      </li>
      <li>Check if the current string is a valid word according to the trie
        <ul>
          <li>If it is, add it to the word list</li>
        </ul>
      </li>
      <li>For each possible next move:
        <ul>
          <li>Branch to that tile</li>
          <li>Go back to step 2 and repeat</li>
        </ul>
      </li>
    </ol>
  </li>
</ul>

<p>Though using a trie doesn’t technically improve the worst case time complexity, the early stopping significantly helps the average.</p>

<h2 id="scoring">Scoring</h2>

<p>To rank words and calculate a board’s maximum score, I needed a function that tells how many points a word is worth. Empirically, I found this to be</p>

<p><br /></p>

\[\text{wordScore}(n) = 
\begin{cases} 
100 &amp; n = 3 \\
400 &amp; n = 4 \\
800 &amp; n = 5 \\
1400 + 200(n - 6) &amp; n \geq 6
\end{cases}\]

<p><br /></p>

<p>with \(n\) being the length of the word. (Words of length 1 and 2 are not valid in this game.)</p>

<h2 id="web-app">Web App</h2>

<div class="imgCont">
    
        <img src="/assets/images/word-hunter-still.png" class="clickToModal postImage" style="" />
        
        
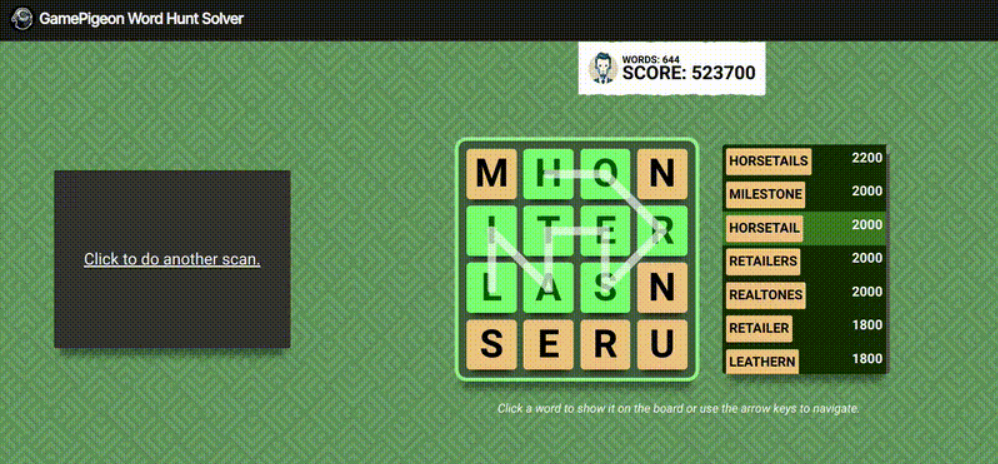
        <p class="imgCaption">A still of the web UI</p>
    
 
</div>

<p>My initial implementation of this was a <a href="https://github.com/ken-myers/wordhunter-python">Python CLI</a>, but I thought a web app would look nicer and be easier to use. Luckily, OpenCV has a JS library that’s pretty much one-to-one with the Python version, so porting that over was pretty easy. Reimplementing the solve logic was also pretty straightforward, though I did end up implementing the trie from scratch rather than using a library like I did in Python.</p>

<p>The most time consuming part was without a doubt the UI, which I painstakingly styled to match GamePigeon’s as closely as possible.*</p>

<div class="small-print">
  <p><br />
*<em>I even drew out the tiled background pattern myself in GIMP. I eventually gave up on recreating it perfectly and went with a simplified version because the original was messing with my head too much.</em></p>
</div>]]></content><author><name></name></author><summary type="html"><![CDATA[The app in action]]></summary></entry><entry><title type="html">A Self-Improving, Semi-Autonomous, Voice-Activated GPT Assistant</title><link href="/posts/gpt-assistant" rel="alternate" type="text/html" title="A Self-Improving, Semi-Autonomous, Voice-Activated GPT Assistant" /><published>2023-04-28T00:00:00+00:00</published><updated>2023-04-28T00:00:00+00:00</updated><id>/posts/gpt-assistant</id><content type="html" xml:base="/posts/gpt-assistant"><![CDATA[<div class="vidCont">
    <video class="postVid" style="width:1080px;" controls="" play-inline="">
        <source src="/assets/videos/assistant-demo.mp4" type="video/mp4" />&lt;/source&gt;
    </video>
    
        <p class="vidCaption" style="width:1080px;">A demo of the assistant. Some sections have been sped up and are clearly marked.</p>
    
</div>

<p>This is a quick showcase of something I’ve been working on for the past couple of weeks. There’s still a lot of work to be done, but I’m writing this now to avoid repeating previous mistakes—I put off writing about my last, davinci-based chat bot until it was ‘presentable’, and by then it had been obsoleted by GPT-3.5-turbo and ChatGPT plugins.</p>

<p>Even in a more polished state, this bot isn’t going to do everything for you. I use it for brainstorming, troubleshooting, high-level design, and tedious things like making Tkinter interfaces. I’d already used ChatGPT a fair amount in my day-to-day, and it’s been noticeably more convenient to be able to just say “computer” and ask questions without having to tab over to OpenAI and type them out.</p>

<p>My end goal is a smart assistant that can control my lights, music, etc., and perform internet queries slightly more complicated than what I could do with “Ok, Google”—this would make my commutes more productive/bearable and help me cut back on screen time in general.</p>

<h2 id="capabilities">Capabilities</h2>

<h3 id="hardcoded">Hardcoded</h3>

<p>I programmed the following capabilities into the bot myself:</p>
<ul>
  <li>Speech recognition and synthesis with <a href="https://picovoice.ai/platform/porcupine/">Porcupine</a> and <a href="https://picovoice.ai/platform/cobra/">Cobra</a>, <a href="https://github.com/ggerganov/whisper.cpp">whisper.cpp</a>, and <a href="https://elevenlabs.io">ElevenLabs</a></li>
  <li>A simple console-style interface made with Tkinter</li>
  <li>A scheduler for executing commands at fixed intervals</li>
  <li>Persistent memory with naive recall (retrieves relevant memories by finding the nearest neighbors to each query) built with <a href="https://www.pinecone.io/">Pinecone</a></li>
  <li>The ability to create and manage commands (arbitrary Python code)</li>
</ul>

<h3 id="self-implemented">Self-implemented</h3>

<p>The bot gave itself the ability to do the following upon my request, completely through dialogue*:</p>
<ul>
  <li>Read text files</li>
  <li>Read text from documents (pdf, doc, etc.)</li>
  <li>Create files and directories</li>
  <li>Get a filepath from the user with a file selection dialog</li>
  <li>View open windows</li>
  <li>Scrape text from a given window with <a href="https://github.com/tesseract-ocr/tesseract">Tesseract OCR</a></li>
  <li>Perform Google searches</li>
  <li>Browse webpages (scrape and read their text)</li>
  <li>Securely store secrets**</li>
  <li>Run arbitrary bash script with user permission</li>
</ul>

<p>It also implemented for itself:</p>
<ul>
  <li>A Gmail address; the bot checks the inbox periodically and responds to any new mail.</li>
  <li>A Telegram bot; the bot uses long polling (its idea) and responds to messages pretty much instantaneously.</li>
</ul>

<p>The bot is decently capable of stringing these together to get things done, but it does sometimes need a little encouragement. It could “email my brother’s school calling in sick for him” without intervention, but not “create a to-do list app in Angular with Auth0” (yet).</p>

<div class="small-print">
  <p><br />
*<em>I had to fix some issues with the Spotify implementation myself—the library it chose was prompting for user input in stdout, which was not being fed back to the bot. I feel like this was more on me and that the bot did fine with what it was given.</em></p>

  <p>*<em>*I implemented helper functions <code class="language-plaintext highlighter-rouge">save_secret</code> and <code class="language-plaintext highlighter-rouge">get_secret</code>, but the bot wrote the code to prompt the user for secrets and pass them to said helpers.</em></p>

</div>
<h2 id="design">Design</h2>

<p>This will probably be subject to change—I have a million different ideas to try out.</p>

<h3 id="prompting">Prompting</h3>

<p>In a system message, I tell GPT-4 that it is “Alex, a speech-enabled assistant and conversation partner.” I give it a few personality guidelines, and instruct it to use the following XML tags in its responses:</p>

<div class="language-plaintext highlighter-rouge"><div class="highlight"><pre class="highlight"><code>&lt;input medium="console"&gt;...&lt;/input&gt; - Represents user's typed console input
&lt;input medium="speech"&gt;...&lt;/input&gt; - Represents user's spoken input
&lt;command-output&gt;...&lt;/command-output&gt; - Output yielded from commands you execute

&lt;output medium="speech"&gt;...&lt;/output&gt; - Read the text aloud to the user
&lt;output medium="console"&gt;...&lt;/output&gt; - Print the text to the console
&lt;command&gt;...&lt;/command&gt; - Execute the enclosed command
&lt;var name="VARNAME"&gt;...&lt;/var&gt; - Store the content in VARNAME, use as $VARNAME in commands
&lt;thought&gt;...&lt;/thought&gt; - For planning and reasoning (mandatory before each tag)
&lt;schedule name="NAME" description="DESCRIPTION" instructions="INSTRUCTIONS" period="PERIOD"&gt;COMMAND&lt;/schedule&gt; - Schedules a command to be run ever PERIOD seconds if set and to be handled with the provided instructions. If period is unset, the task will retrigger after every completion. The description should give instructions on what to do with output.
&lt;unschedule&gt;NAME&lt;/unschedule&gt; - Unschedule a command to be run
&lt;listen /&gt; - Listen for user audio
&lt;end-of-response /&gt; - End your message (mandatory)
</code></pre></div></div>

<p>Right now these are hardcoded in, but I plan soon to construct this boiler on startup based on the configured interfaces and their associated tags.</p>

<p>I then let it know what commands it has access to, give it a few more guidelines, examples, and start giving it user input.</p>

<h3 id="response-handling">Response Handling</h3>

<p>I’ve tried my best not to build a monolith. The system is broken into specialized components. I’ve built six so far, which can be mixed and matched with no problem.</p>
<ul>
  <li>Brain: Formats input and feeds it to GPT, pipes output to other components</li>
  <li>Listener: Listens for wake words, processes speech, and sends transcriptions to the brain as input</li>
  <li>Executor: Manages and executes commands. Also synthesizes speech (yes, this does need to be separated into two components)</li>
  <li>Scheduler: Handles creation, deletion, and execution of scheduled commands</li>
  <li>Recaller: Prepends all input with relevant “memories” retrieved from vectorized historical chatlog</li>
  <li>Terminal: The earlier-mentioned Tkinter interface that facilitates text-based I/O</li>
</ul>

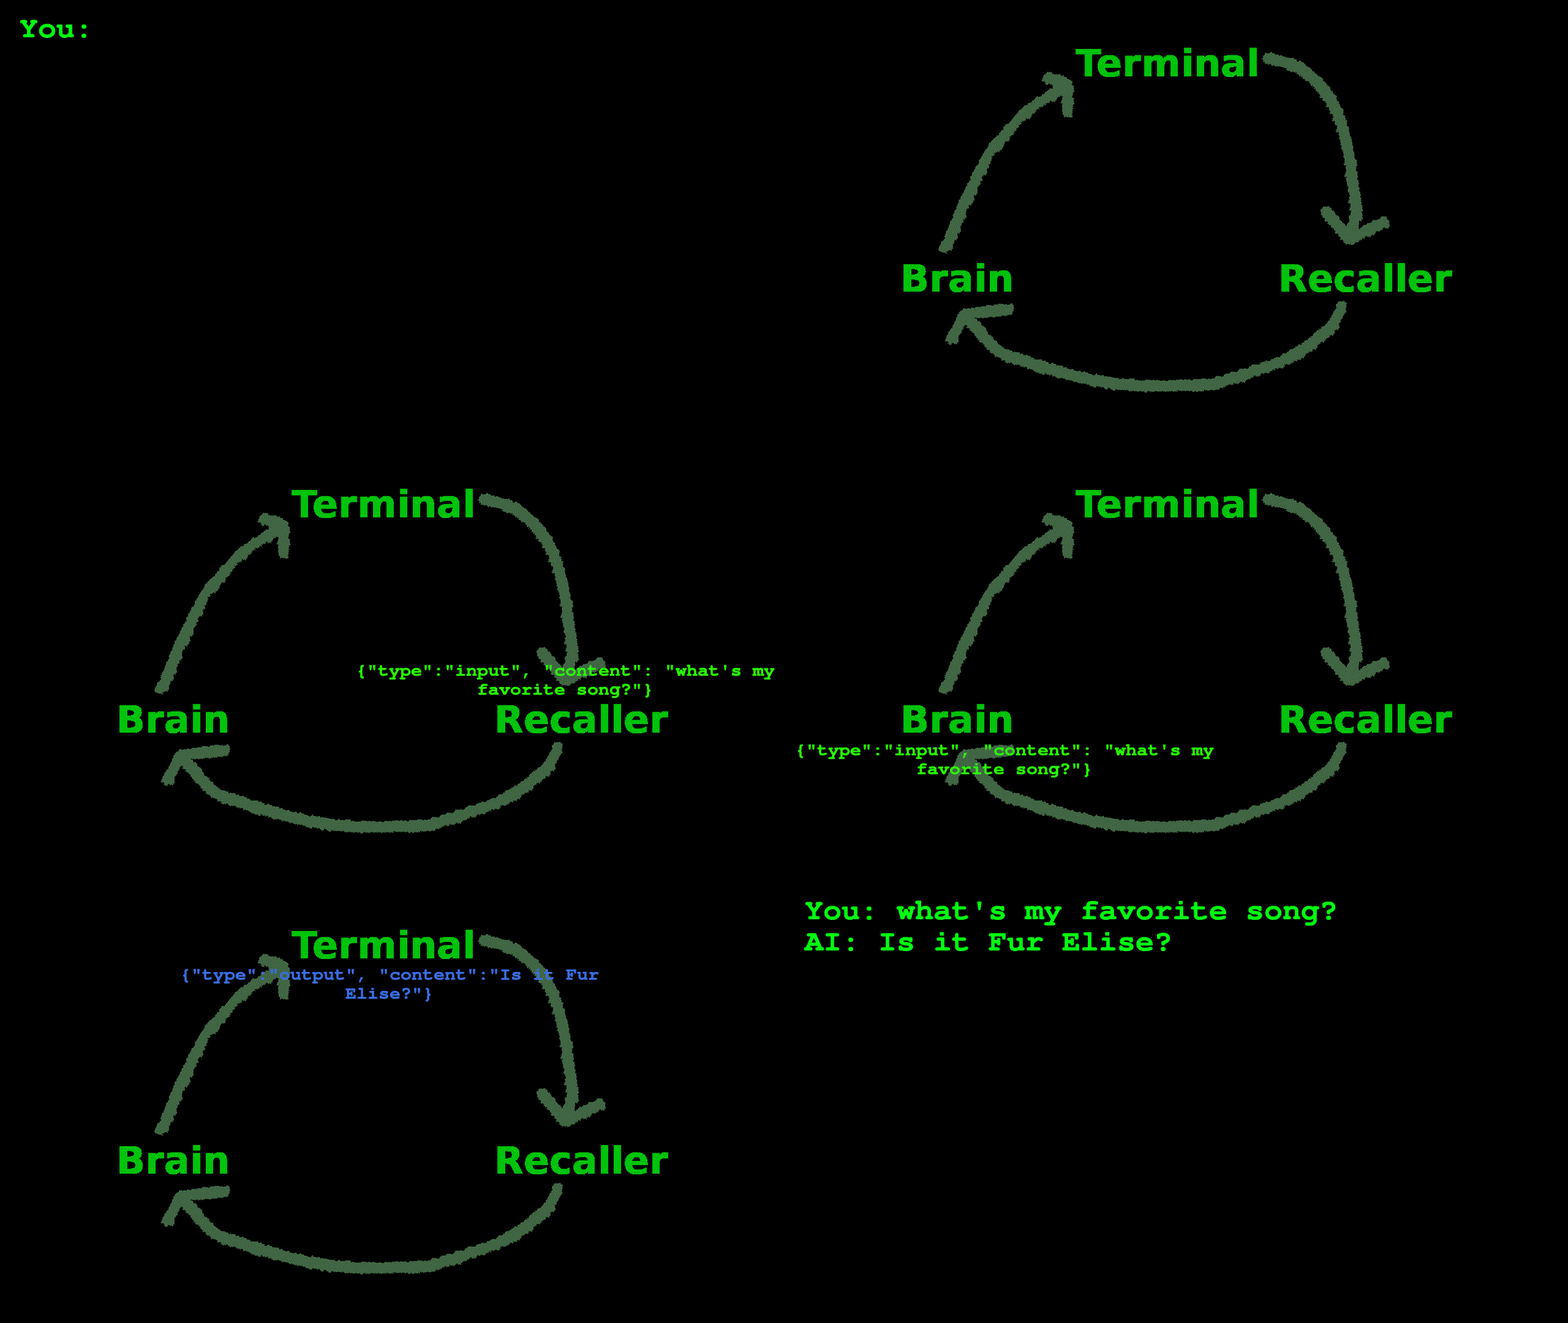
<p>Components are effectively arranged in a loop (interfaces -&gt; afferent components -&gt; brain -&gt; efferent components -&gt; interfaces -&gt; etc.) by a Mediator, which facilitates inter-component communication. Signals are passed from component to component as JSON objects and are either transformed, acted upon, or ignored and passed on unchanged.</p>

<div class="imgCont">
    
        <img src="/assets/images/gptSignals.gif" class="clickToModal postImage" style="width:525px;" />
        
        
        <p class="imgCaption" style="width:525px;">A simplified animated representation of a three-component configuration</p>
    
 
</div>

<p>This modular structure makes the actual main method pretty simple:</p>

<div class="language-plaintext highlighter-rouge"><div class="highlight"><pre class="highlight"><code>comms = Mediator()

scheduler = Scheduler()
brain = Brain()
executor = Executor(stream_audio=True)
terminal = Terminal()
recaller = Recaller()

comms.register_responder(brain)
comms.register_interface(executor)
comms.register_interface(terminal)
comms.register_interface(scheduler)
comms.add_afferent(recaller)

scheduler.start()
executor.start()
terminal.start()
</code></pre></div></div>

<p><span class="small-print"><br /><em>Note: This entire architecture was loosely inspired by a lesson from my neuroscience-minor girlfriend (she likes to study by teaching) that touched on efferent and afferent pathways. I myself am not a neuroscience major, and I understand that my use of the terms here might not be completely correct. For our purposes, afferent components intercept/process signals heading towards the brain, and efferent, those away.</em></span></p>

<h3 id="commands">Commands</h3>

<p>One of the few commands the bot has hardcoded into it is <code class="language-plaintext highlighter-rouge">create_command</code>:</p>

<div class="language-plaintext highlighter-rouge"><div class="highlight"><pre class="highlight"><code>create_command --command_name="" --description="" --script_content="" --dependencies=""
</code></pre></div></div>

<p>This creates a command for the bot to use later, just as it used this one. The script content is saved to a Python module in a commands package, and a virtual environment is created for it with the provided dependencies. In the description for <code class="language-plaintext highlighter-rouge">create_command</code>, the bot is instructed to include an <code class="language-plaintext highlighter-rouge">execute</code> method whose return value will be output when the command is called. The arguments are inferred from this method’s signature, and they, along with the command name and description, are saved to a JSON file which is used to construct the boilerplate on startup.</p>

<p>When a bot-created command is called, the appropriate module is loaded with importlib and the <code class="language-plaintext highlighter-rouge">execute</code> method is called from the command’s virtual environment.</p>

<h2 id="future-plans">Future Plans</h2>

<ul>
  <li>Let the bot spawn (containerized?) <a href="https://github.com/Significant-Gravitas/Auto-GPT">AutoGPT</a> instances</li>
  <li>Save on tokens by letting the bot quote previous messages by reference (i.e. named variables) instead of verbatim regeneration</li>
  <li>Modularize components/interfaces and allow the bot to create them</li>
  <li>Dynamically generate boilerplate based on configured components</li>
  <li>Better-than-naive memory recall</li>
  <li>Use recall to identify useful commands per query instead of including them all in boiler</li>
  <li>Use GPT-3.5 for intermediate logic</li>
  <li>Give the bot eyes with <a href="https://minigpt-4.github.io/">MiniGPT-4</a></li>
  <li>Fork <a href="https://github.com/Swordfish90/cool-retro-term">Cool-Retro-Term</a> for a cooler terminal interface</li>
</ul>

<p>I haven’t released the source yet since the architecture of the whole system is not yet stable, and because it’s still all tangled up with my own utility libraries, but if you’d like to collaborate or are interested in this project in any way, feel free to reach out to me at <a href="mailto:ken@kenmyers.io">ken@kenmyers.io</a>.</p>]]></content><author><name></name></author><summary type="html"><![CDATA[&lt;/source&gt; A demo of the assistant. Some sections have been sped up and are clearly marked.]]></summary></entry><entry><title type="html">An Attempt at Evolutionary Melody Generation</title><link href="/posts/melodyfarm" rel="alternate" type="text/html" title="An Attempt at Evolutionary Melody Generation" /><published>2022-11-02T00:00:00+00:00</published><updated>2022-11-02T00:00:00+00:00</updated><id>/posts/melodyfarm</id><content type="html" xml:base="/posts/melodyfarm"><![CDATA[<div class="vidCont">
    <video class="postVid" style="width:1080px;" controls="" play-inline="">
        <source src="/assets/videos/melodyfarm-demo.mp4" type="video/mp4" />&lt;/source&gt;
    </video>
    
        <p class="vidCaption" style="width:1080px;">A demo of the app</p>
    
</div>

<p>This is a webapp I made in December 2020 and am just now getting to writing about. You can view it <a href="https://kenmyers.io/melodyfarm/">here</a>.</p>

<p>The idea is to selectively breed melodies with a human in the loop as the fitness test.</p>

<h2 id="algorithm">Algorithm</h2>

<p>More accurately, we breed music generators, or “organisms” as I will refer to them here. Each organism has a set of equations that determine how it generates melodies—this would be the metaphorical genome.</p>

<p>The algorithms I used to both generate organisms’ equations and the subsequent melodies are designed by myself and completely arbitrary.</p>

<h4 id="generating-melodies">Generating Melodies</h4>

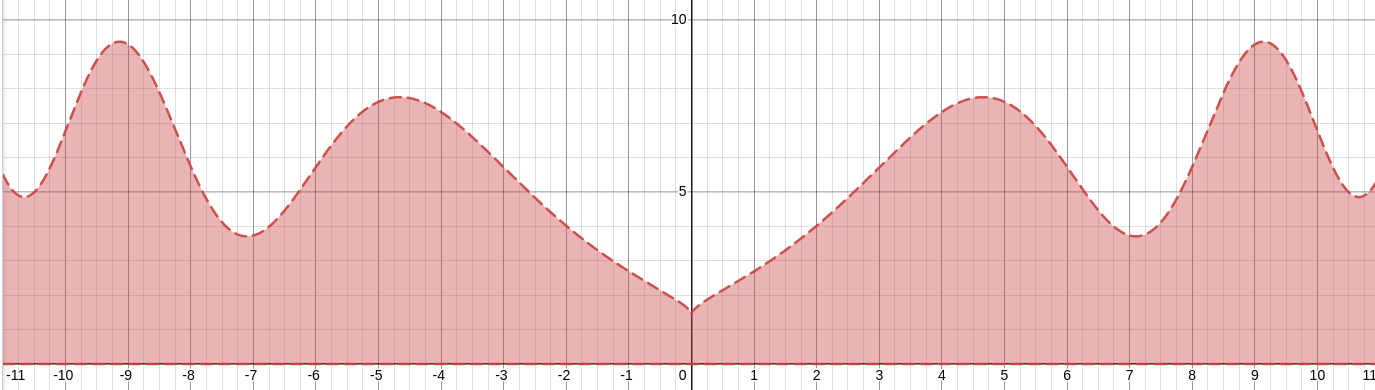
<p>Each organism has two member equations—<a href="https://en.wikipedia.org/wiki/Probability_distribution">probability distributions</a> for rhythm/note duration and for pitch. These functions take a pitch/duration as an input, and yield the relative probability of it being output by the organism. Each equation is composed of constants, trigonometric and algebraic operators, variables for the durations and pitches of the melody’s last three notes, and, of course, the input variable \(x\).</p>

<div class="imgCont">
    
        <img src="/assets/images/distributionExample.png" class="clickToModal postImage" style="" />
        
        
        <p class="imgCaption">A graph of a probability distribution for pitch with the equation \(5cos^2(\dfrac{x^2}{20}-1) + x^{\frac{2}{3}}\)</p>
    
 
</div>

<p>For example, in the graph above, the peaks around \(x = \pm 9\) tell us that a note nine scale degrees above or below the center note is most likely to be output by this organism, and the dip at \(x = 0\) that the center note itself is least.</p>

<p>The organisms generate melodies note by note, randomly picking pitch and duration with these distributions.</p>

<h4 id="populating-the-bracket">Populating The Bracket</h4>

<p>First generation organisms are initialized with randomly generated equations of varying length.</p>

<p>After that, each organism generates two melodies that are put against each other in a randomly seeded bracket. The next generation is created from the winning N (four in my current implementation) through permutation and mutation.</p>

<p>Permutation populates the bracket with every possible combination of winning equations, each organism contributing half its “genome.”</p>

<p>Mutation does one of four things:</p>
<ul>
  <li>Replaces a random operator/operand in an equation with another</li>
  <li>Scales a constant by a random factor</li>
  <li>Deletes a random operator, and operand(s) if the operator is not unary</li>
  <li>Inserts a random operator (and operand(s))</li>
</ul>

<p>Each generation comprises all permutations of winning genomes, N mutants (five, currently), the previous generation’s unaltered winners, and N=3 random new organisms.</p>

<h2 id="implementation">Implementation</h2>

<p>A webapp lets multiple users vote on brackets at the same (or not same) time. This made sense for this project since multiple users means faster generation cycles and less bias.</p>

<h3 id="api">API</h3>

<p>The API is written in Python with Flask, hosted on Heroku alongside a PostgreSQL database for bracket data, and has two endpoints: one to request a pair to vote on, and one to cast a vote.</p>

<p>The first takes GET requests with no arguments and yields two base64-encoded MIDI melodies and their respective identifiers, if any are available.</p>

<p>The second takes POST requests with arguments for the pair and loser’s identifiers, and eliminates the loser from the bracket. If the pair was the last of a bracket tier, new pairs are generated for the next tier. If the pair was the last of the entire bracket, a new bracket is generated from the top organisms as described above.</p>

<h3 id="ui">UI</h3>

<div class="imgCont">
    
        <img src="/assets/images/melodyUI.png" class="clickToModal postImage" style="width:800px;" />
        
        
        <p class="imgCaption" style="width:800px;">A still of the UI</p>
    
 
</div>

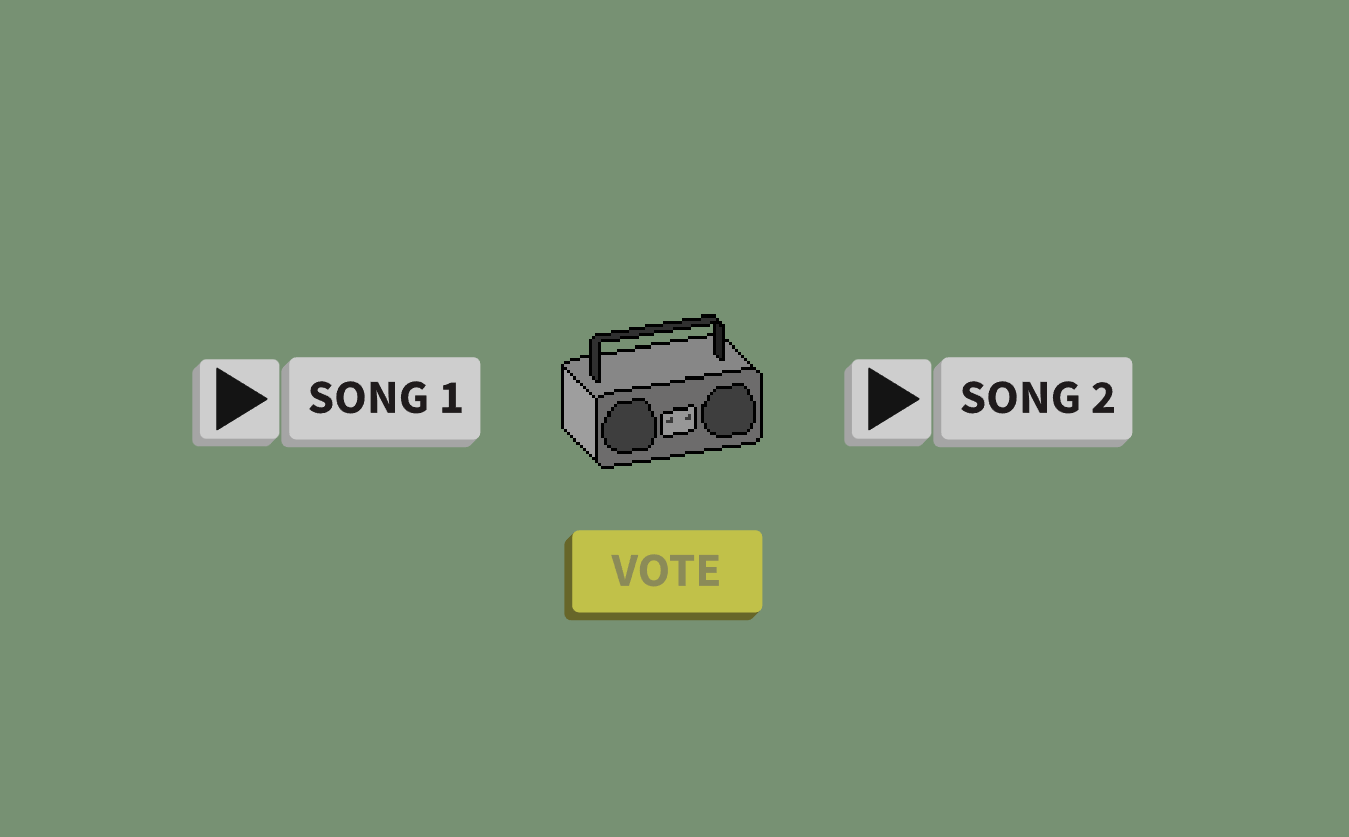
<p>The UI is written in plain HTML, CSS, and JavaScript. It is minimalistically designed with graphics I made myself. A random background color is selected and a pair fetched on page load. There are buttons to hear and select each song, cast your vote, and that’s about it.</p>

<p>You can view the source for the UI <a href="https://github.com/ken-myers/melodyfarm">here</a> and a demo <a href="https://kenmyers.io/melodyfarm/">here</a>.</p>

<h2 id="results">Results</h2>

<p>The app was a success in that it functions without error and correctly implements the algorithms described above. The algorithm itself, however, is naive—so far, the melodies do not appear to be growing any more pleasant, nor my methods of genetic recombination to yield organisms similar to their two parents for that matter. I am interested to see what would come of this idea if it used something like Magenta’s <a href="https://magenta.tensorflow.org/music-vae">MusicVAE</a> to represent melodies in a <a href="https://towardsdatascience.com/understanding-latent-space-in-machine-learning-de5a7c687d8d">latent space</a>, where operations performed on melodies have more intuitive results.</p>]]></content><author><name></name></author><summary type="html"><![CDATA[&lt;/source&gt; A demo of the app]]></summary></entry><entry><title type="html">Stellar Cartography With Self Organizing Maps</title><link href="/posts/starmaps" rel="alternate" type="text/html" title="Stellar Cartography With Self Organizing Maps" /><published>2020-09-01T00:00:00+00:00</published><updated>2020-09-01T00:00:00+00:00</updated><id>/posts/starmaps</id><content type="html" xml:base="/posts/starmaps"><![CDATA[<div class="imgCont">
    
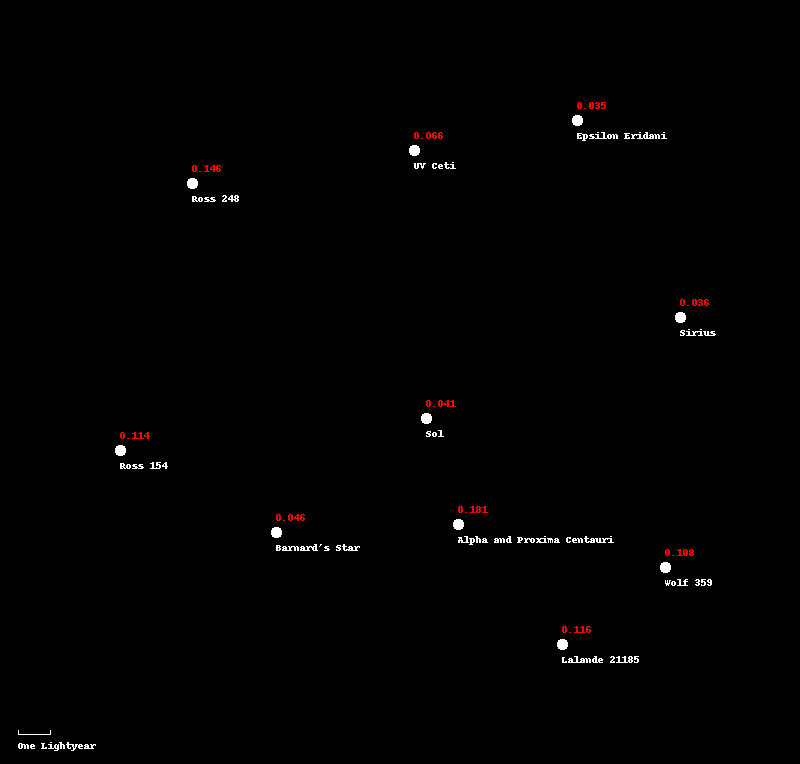
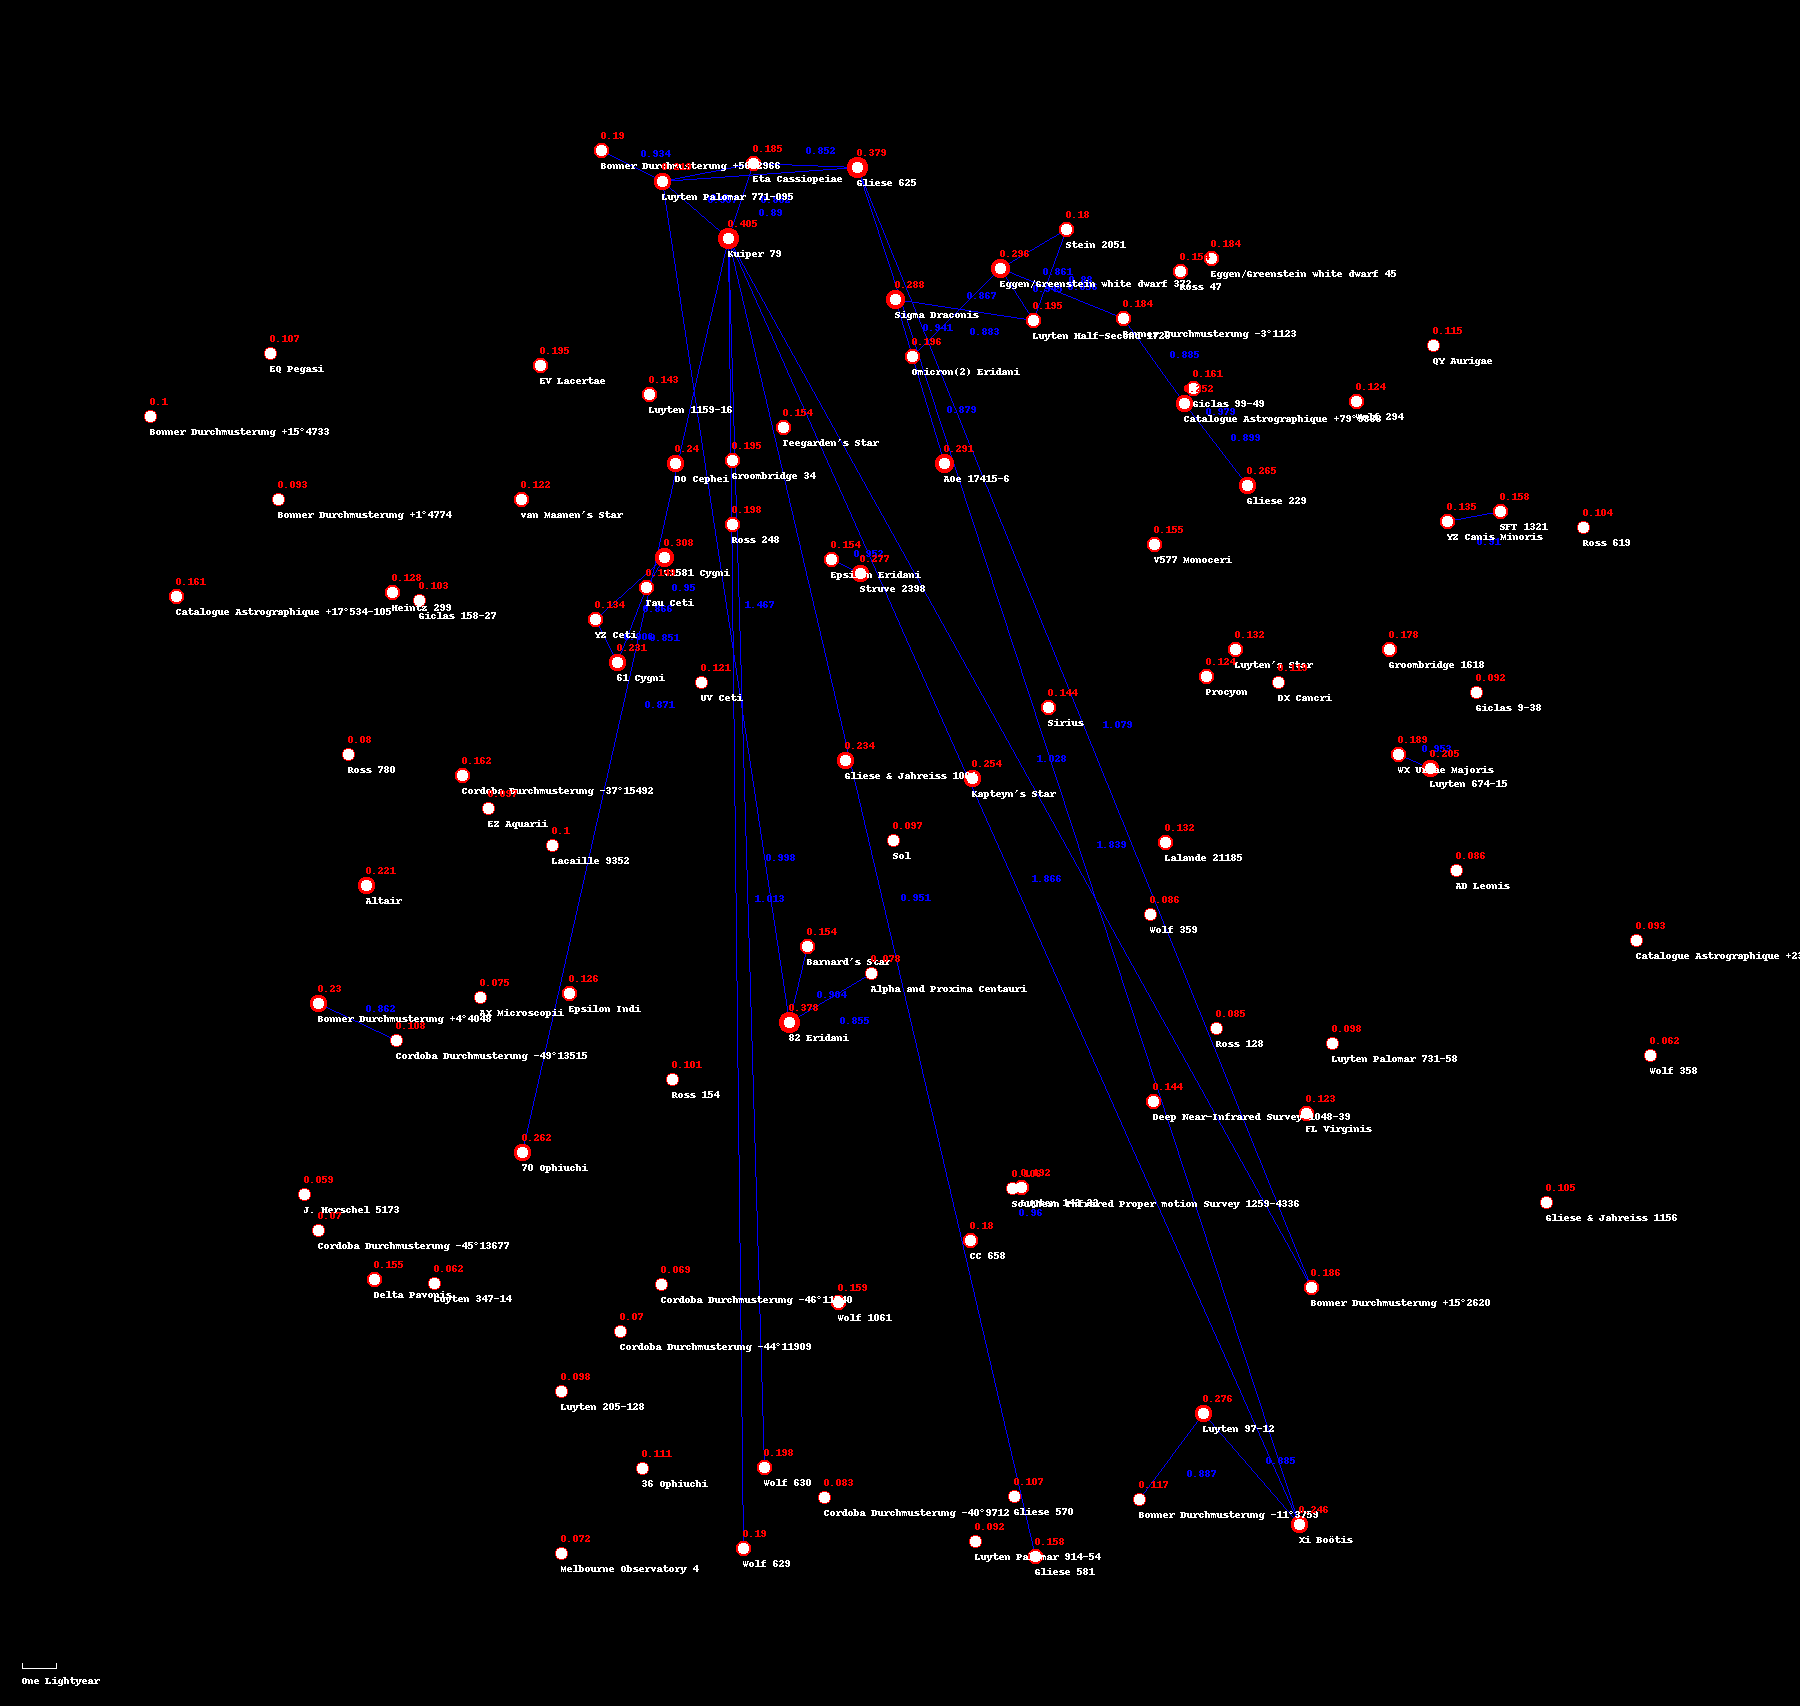
        <img src="/assets/images/starmapPretty.png" class="clickToModal postImage" style="width:800px;" />
        
        
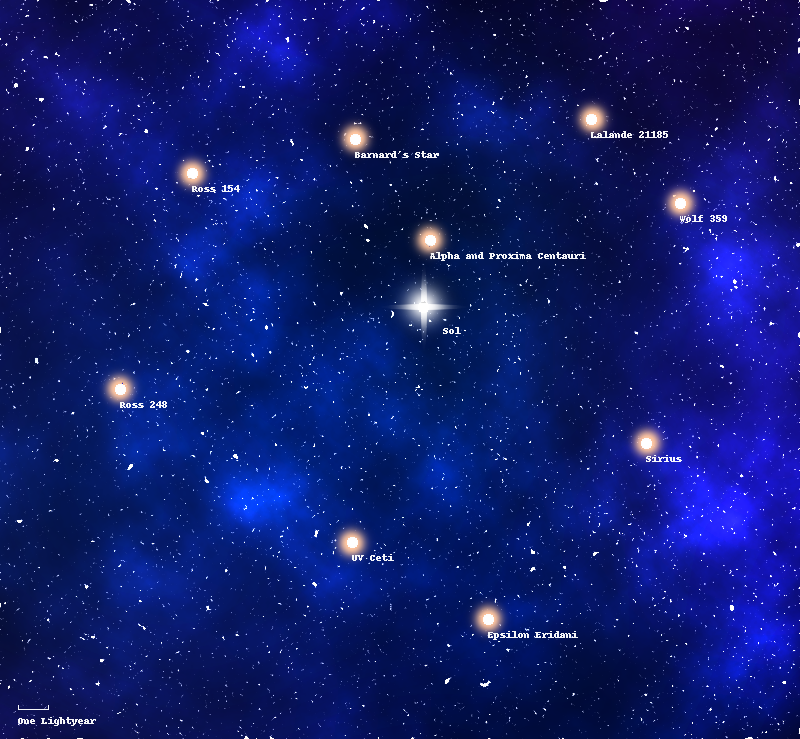
        <p class="imgCaption" style="width:800px;">Distance optimized map of the 10 closest stars to Earth, Sol included. This one has an average error of around 8.9%.</p>
    
 
</div>

<p>There was something of a family debate over whether a reduced-dimensionality starmap could still be accurate enough as to be useful, so I made a covid-quarantine experiment of it.</p>

<h2 id="process">Process</h2>
<p>The idea is pretty simple: create a 2D starmap in which the distances between each star are as accurate as possible.</p>

<div class="imgCont">
    
        <img src="/assets/images/starGenDemo.gif" class="clickToModal postImage" style="width:525px;" />
        
        
        <p class="imgCaption" style="width:525px;">Generation of a map of our 30 nearest stars.</p>
    
 
</div>

<p>I tried to implement something like a <a href="https://en.wikipedia.org/wiki/Self-organizing_map">Kohonen map</a>. I’m not sure if it actually falls under that name, but it does follow the same principles of iteratively changing the position of each node towards a more ideal state, which in this case would be one in which the distances between each pair on the board are most accurate. Here’s my algorithm:</p>

<ul>
  <li>Randomly initialize each item’s position.</li>
  <li>Repeat the following n times or until convergence:
    <ul>
      <li>For each item in the dataset:
        <ol>
          <li>Calculate and store the average pairwise error (discrepancy between true distance and distance on the map) between the given item and all other items.</li>
          <li>Shift the item’s position by a certain increment in both directions on each axis, calculating and storing the item’s average error for each possible move.</li>
          <li>Commit the move which yields the lowest error, and move onto the next item.</li>
        </ol>
      </li>
      <li>If the average error of the whole map has not changed since last iteration, either
        <ul>
          <li>Decrease the increment size if the results will still be significant, or otherwise</li>
          <li>Stop. The map’s error has converged.</li>
        </ul>
      </li>
    </ul>
  </li>
</ul>

<p>A few nuances have been glossed over in this overview. You can view the full code on <a href="https://github.com/ken-myers/stargen">my Github</a>.</p>

<h2 id="results">Results</h2>

<p>One of the principal arguments against the usability of these maps was that “it’s like putting cities in a line.” I made sure to generalize my code for data of any dimension and fed it the largest 20 cities in Texas. If you’re from around here, I think you’d agree with me that this map looks like it’d be helpful to any one-dimensional creatures attempting to traverse the state.</p>

<div class="imgCont">
    
    <div class="scrollWrapper">
    
        <img src="/assets/images/linearCities.png" class="clickToModal postImage" style="" />
        
    </div>
    
        
        <p class="imgCaption">The 20 largest cities in Texas plotted linearly, optimized for distance. (The Metroplex is a bit clustered, as expected.)</p>
    
 
</div>

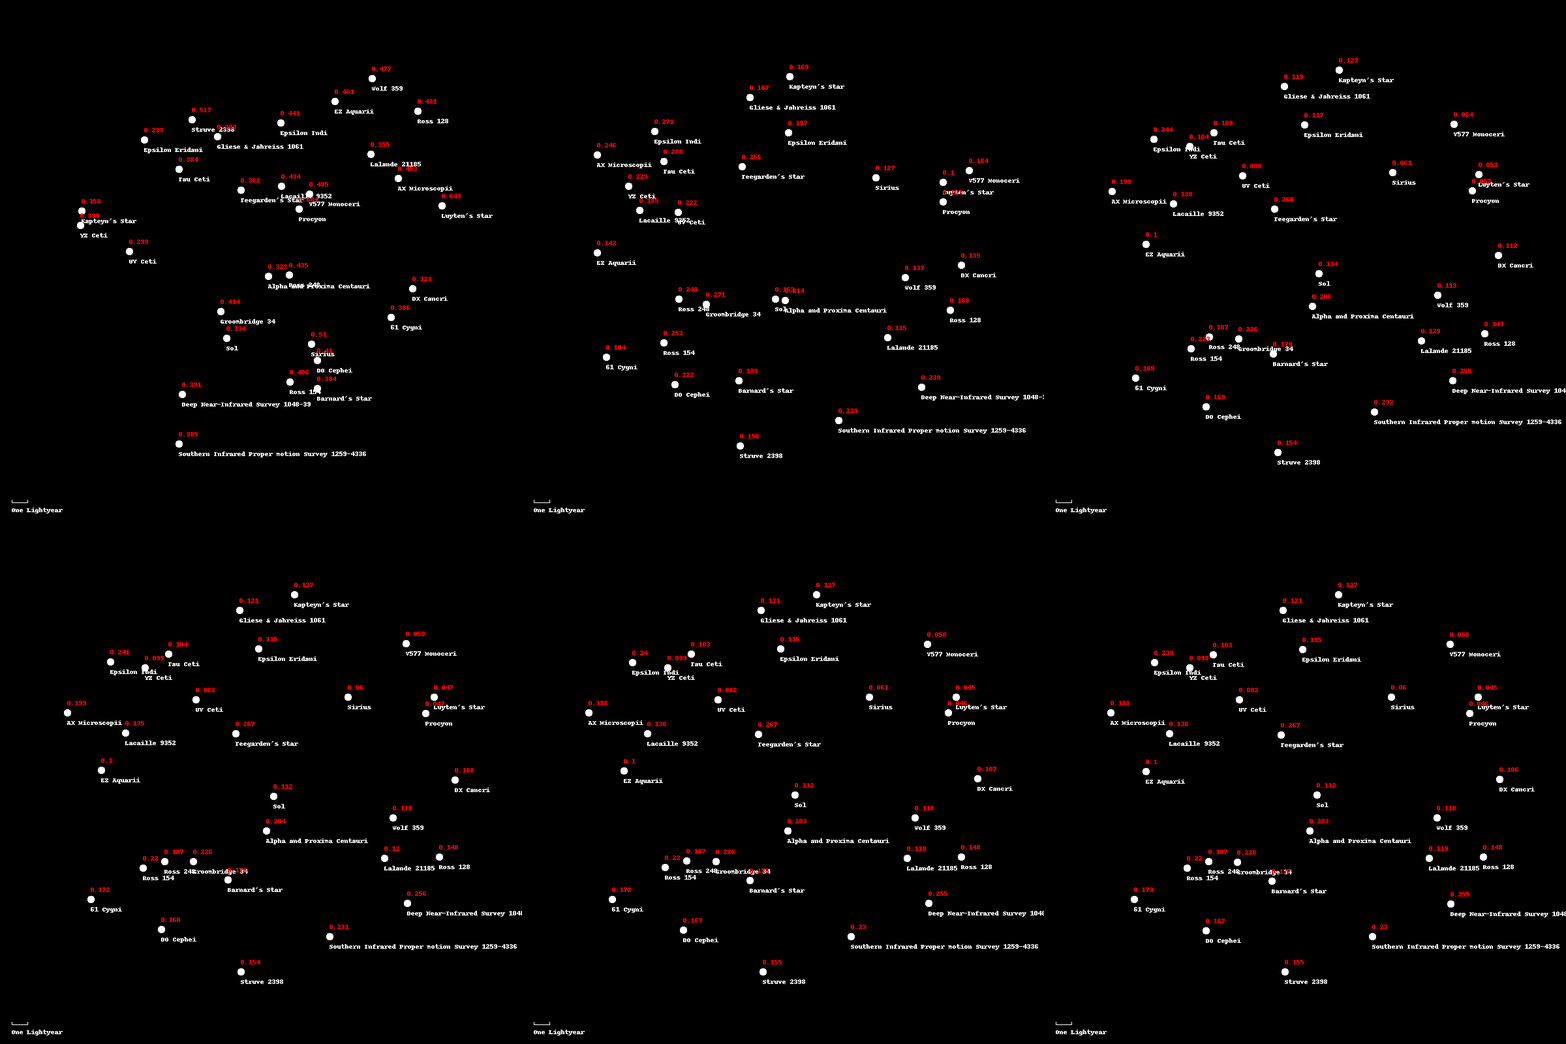
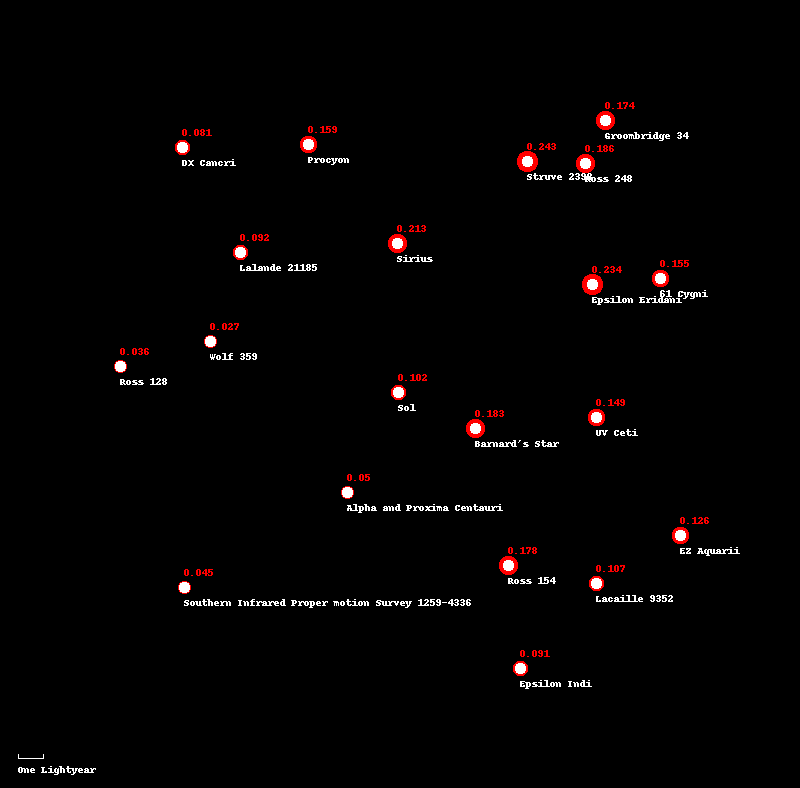
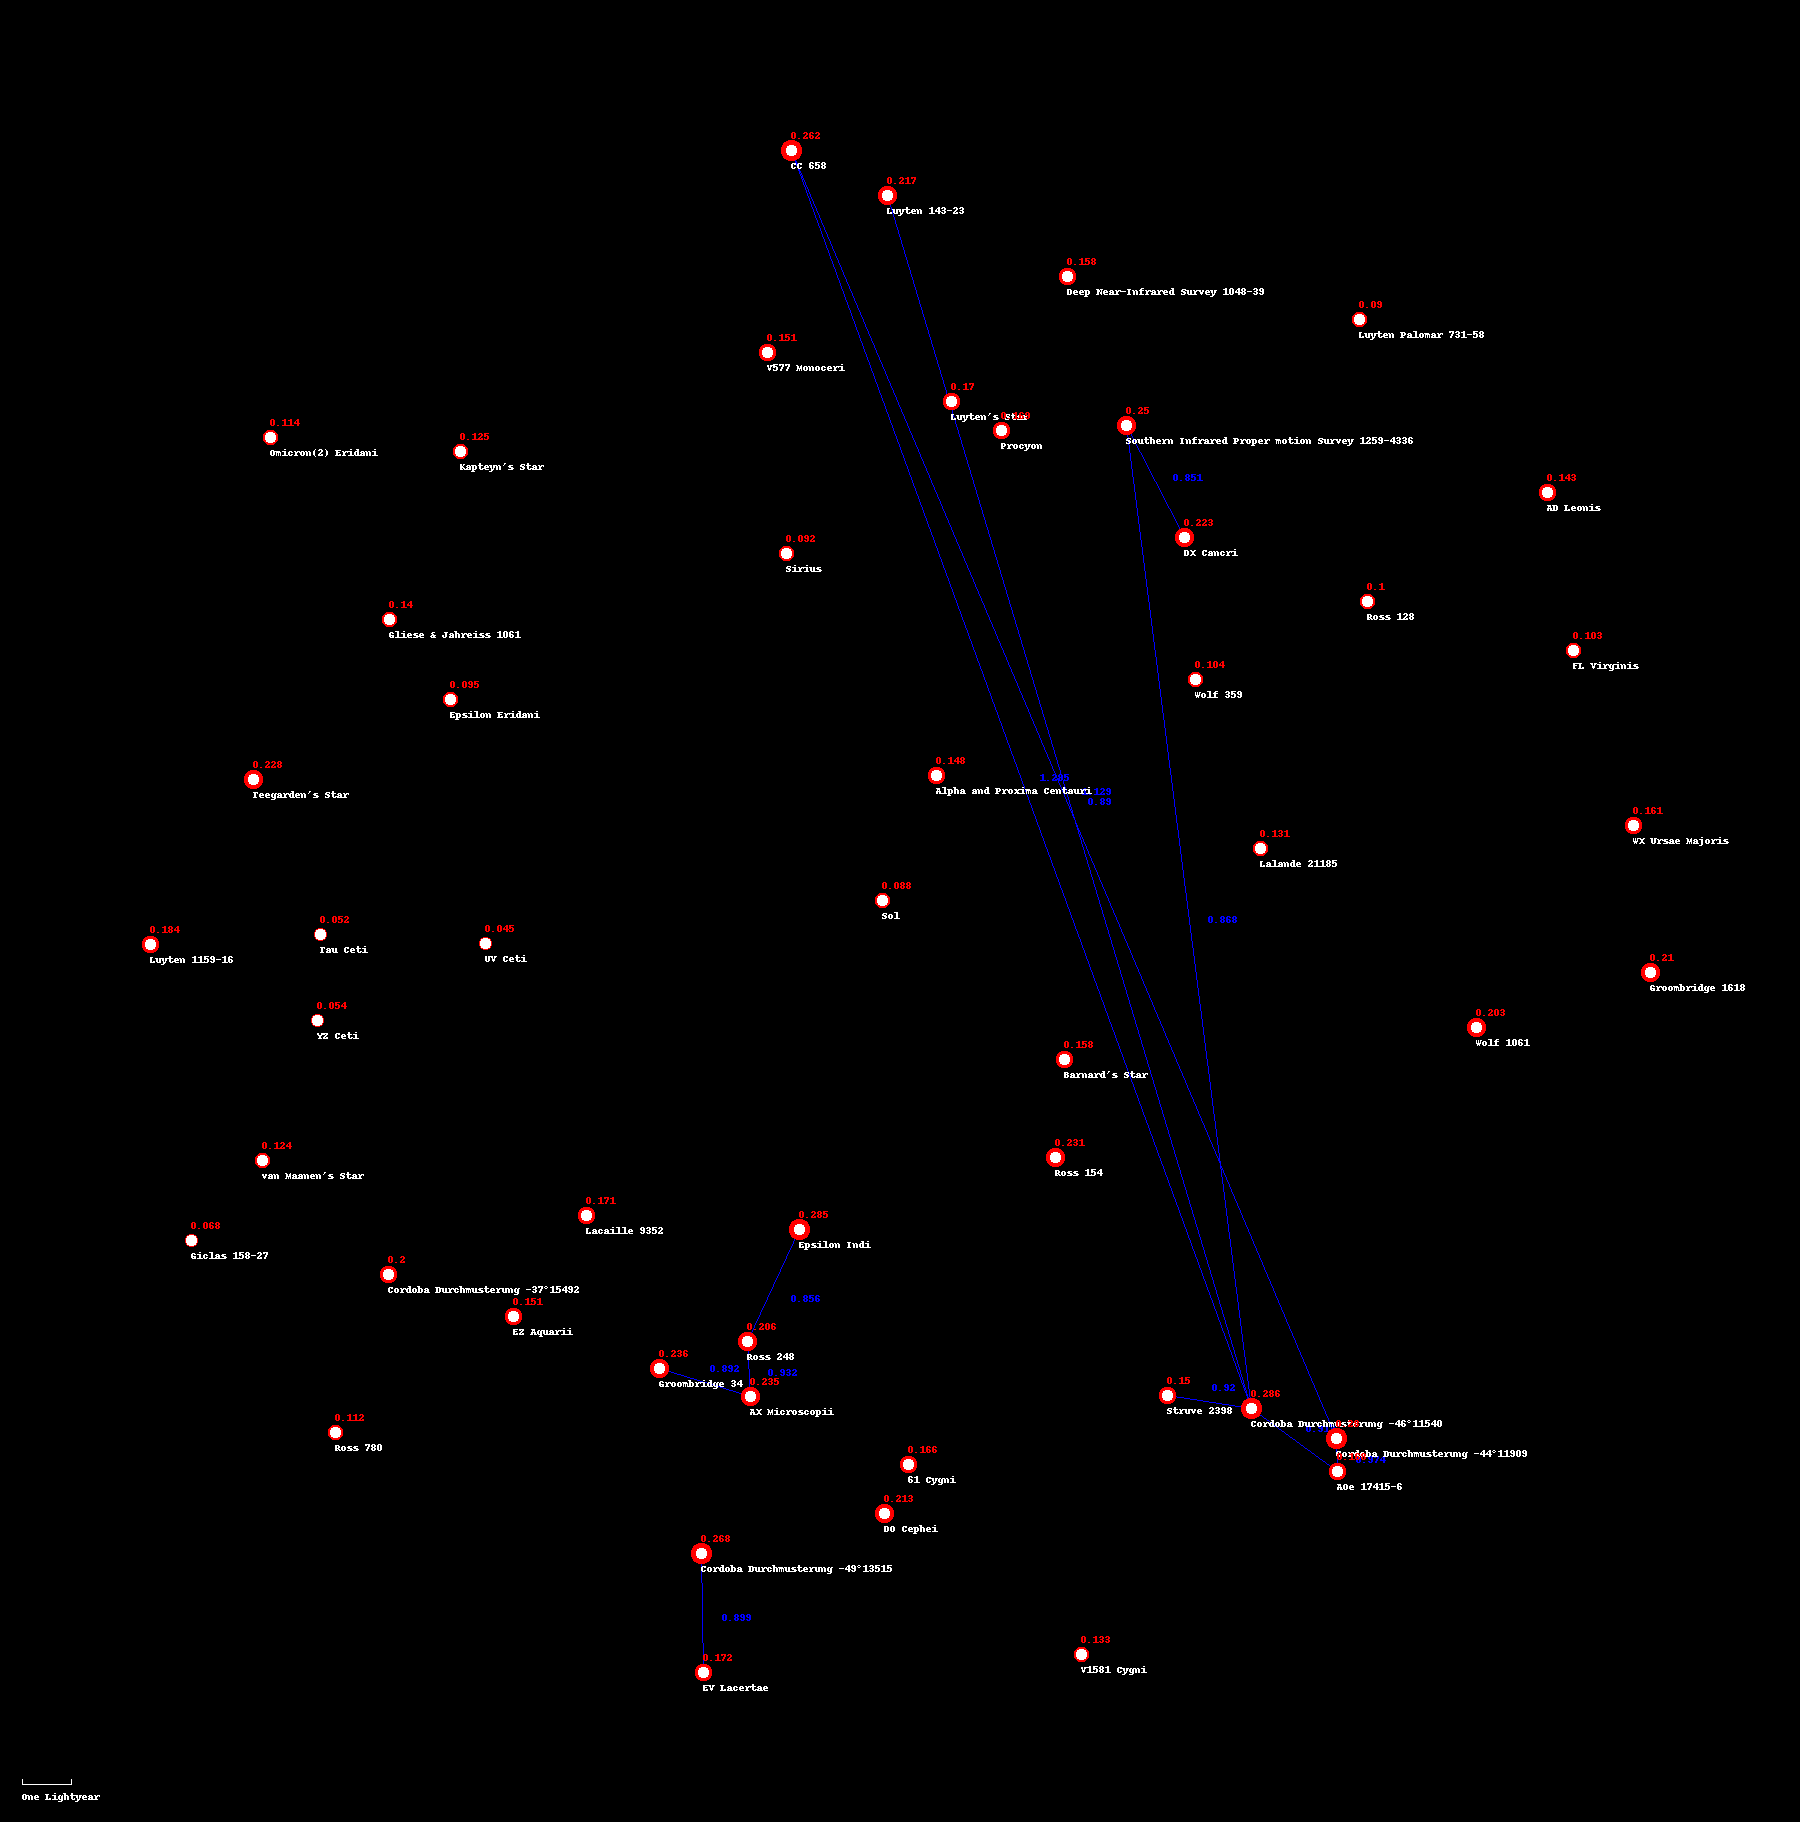
<p>Here are a few more of the starmaps I’ve generated, without any post-processing. (You can click on any of these to view them in more detail.)</p>

<div class="flexrow flexrow4">
<div class="imgCont">
    
        <img src="/assets/images/starmap10.png" class="clickToModal postImage" style="" />
        
        
        <p class="imgCaption">10 nearest stars. Average error of about 8.88%</p>
    
 
</div>
<div class="imgCont">
    
        <img src="/assets/images/starmap20.png" class="clickToModal postImage" style="" />
        
        
        <p class="imgCaption">20 nearest stars. Average error of about 13.2%</p>
    
 
</div>
<div class="imgCont">
    
        <img src="/assets/images/starmap50.png" class="clickToModal postImage" style="" />
        
        
        <p class="imgCaption">50 nearest stars. Average error of about 16.4%</p>
    
 
</div>
<div class="imgCont">
    
        <img src="/assets/images/starmap100.png" class="clickToModal postImage" style="" />
        
        
        <p class="imgCaption">100 nearest stars. Average error of about 16.0%</p>
    
 
</div>
</div>

<p>As for the error indication, the blue lines represent specific distances that are over a user-inputted threshold (in this case, 85%), the red text simply lists the average error of all distances involving the given star, and the red halos are proportional to said error. All of this is toggle-able.</p>

<p>Something to note is that these maps are quite sensitive to initial conditions, so you may have to re-roll a few times until you get a map you’re happy with. In my experience, the average map error for a given dataset could fall anywhere between 10-30%, but I’m sure this number changes when you’re working with something other than stars or cities.</p>

<h2 id="beyond-starmaps">Beyond Starmaps</h2>

<p>Even though the code is capable, there’s not much use in stepping down higher-dimensional data to one, two, or three dimensions because, since it is primarily intended to be used as a cartography tool, my program does not normalize the data you feed it, and uniform higher dimensional coordinates are hard to come by. (If you were, say, a novelist trying to world-build a universe in which there were seven spatial dimensions, then yes, it could be useful.)</p>

<p>I intend to continue working on this project. Besides the obvious refactoring, bug-squashing, and polishing, I’d also like to add support for wrap-around/toroidal space and perhaps globular, a GUI that shows live generation (like the GIF you saw earlier), and the ability to import CSV files.</p>]]></content><author><name></name></author><summary type="html"><![CDATA[Distance optimized map of the 10 closest stars to Earth, Sol included. This one has an average error of around 8.9%.]]></summary></entry></feed>